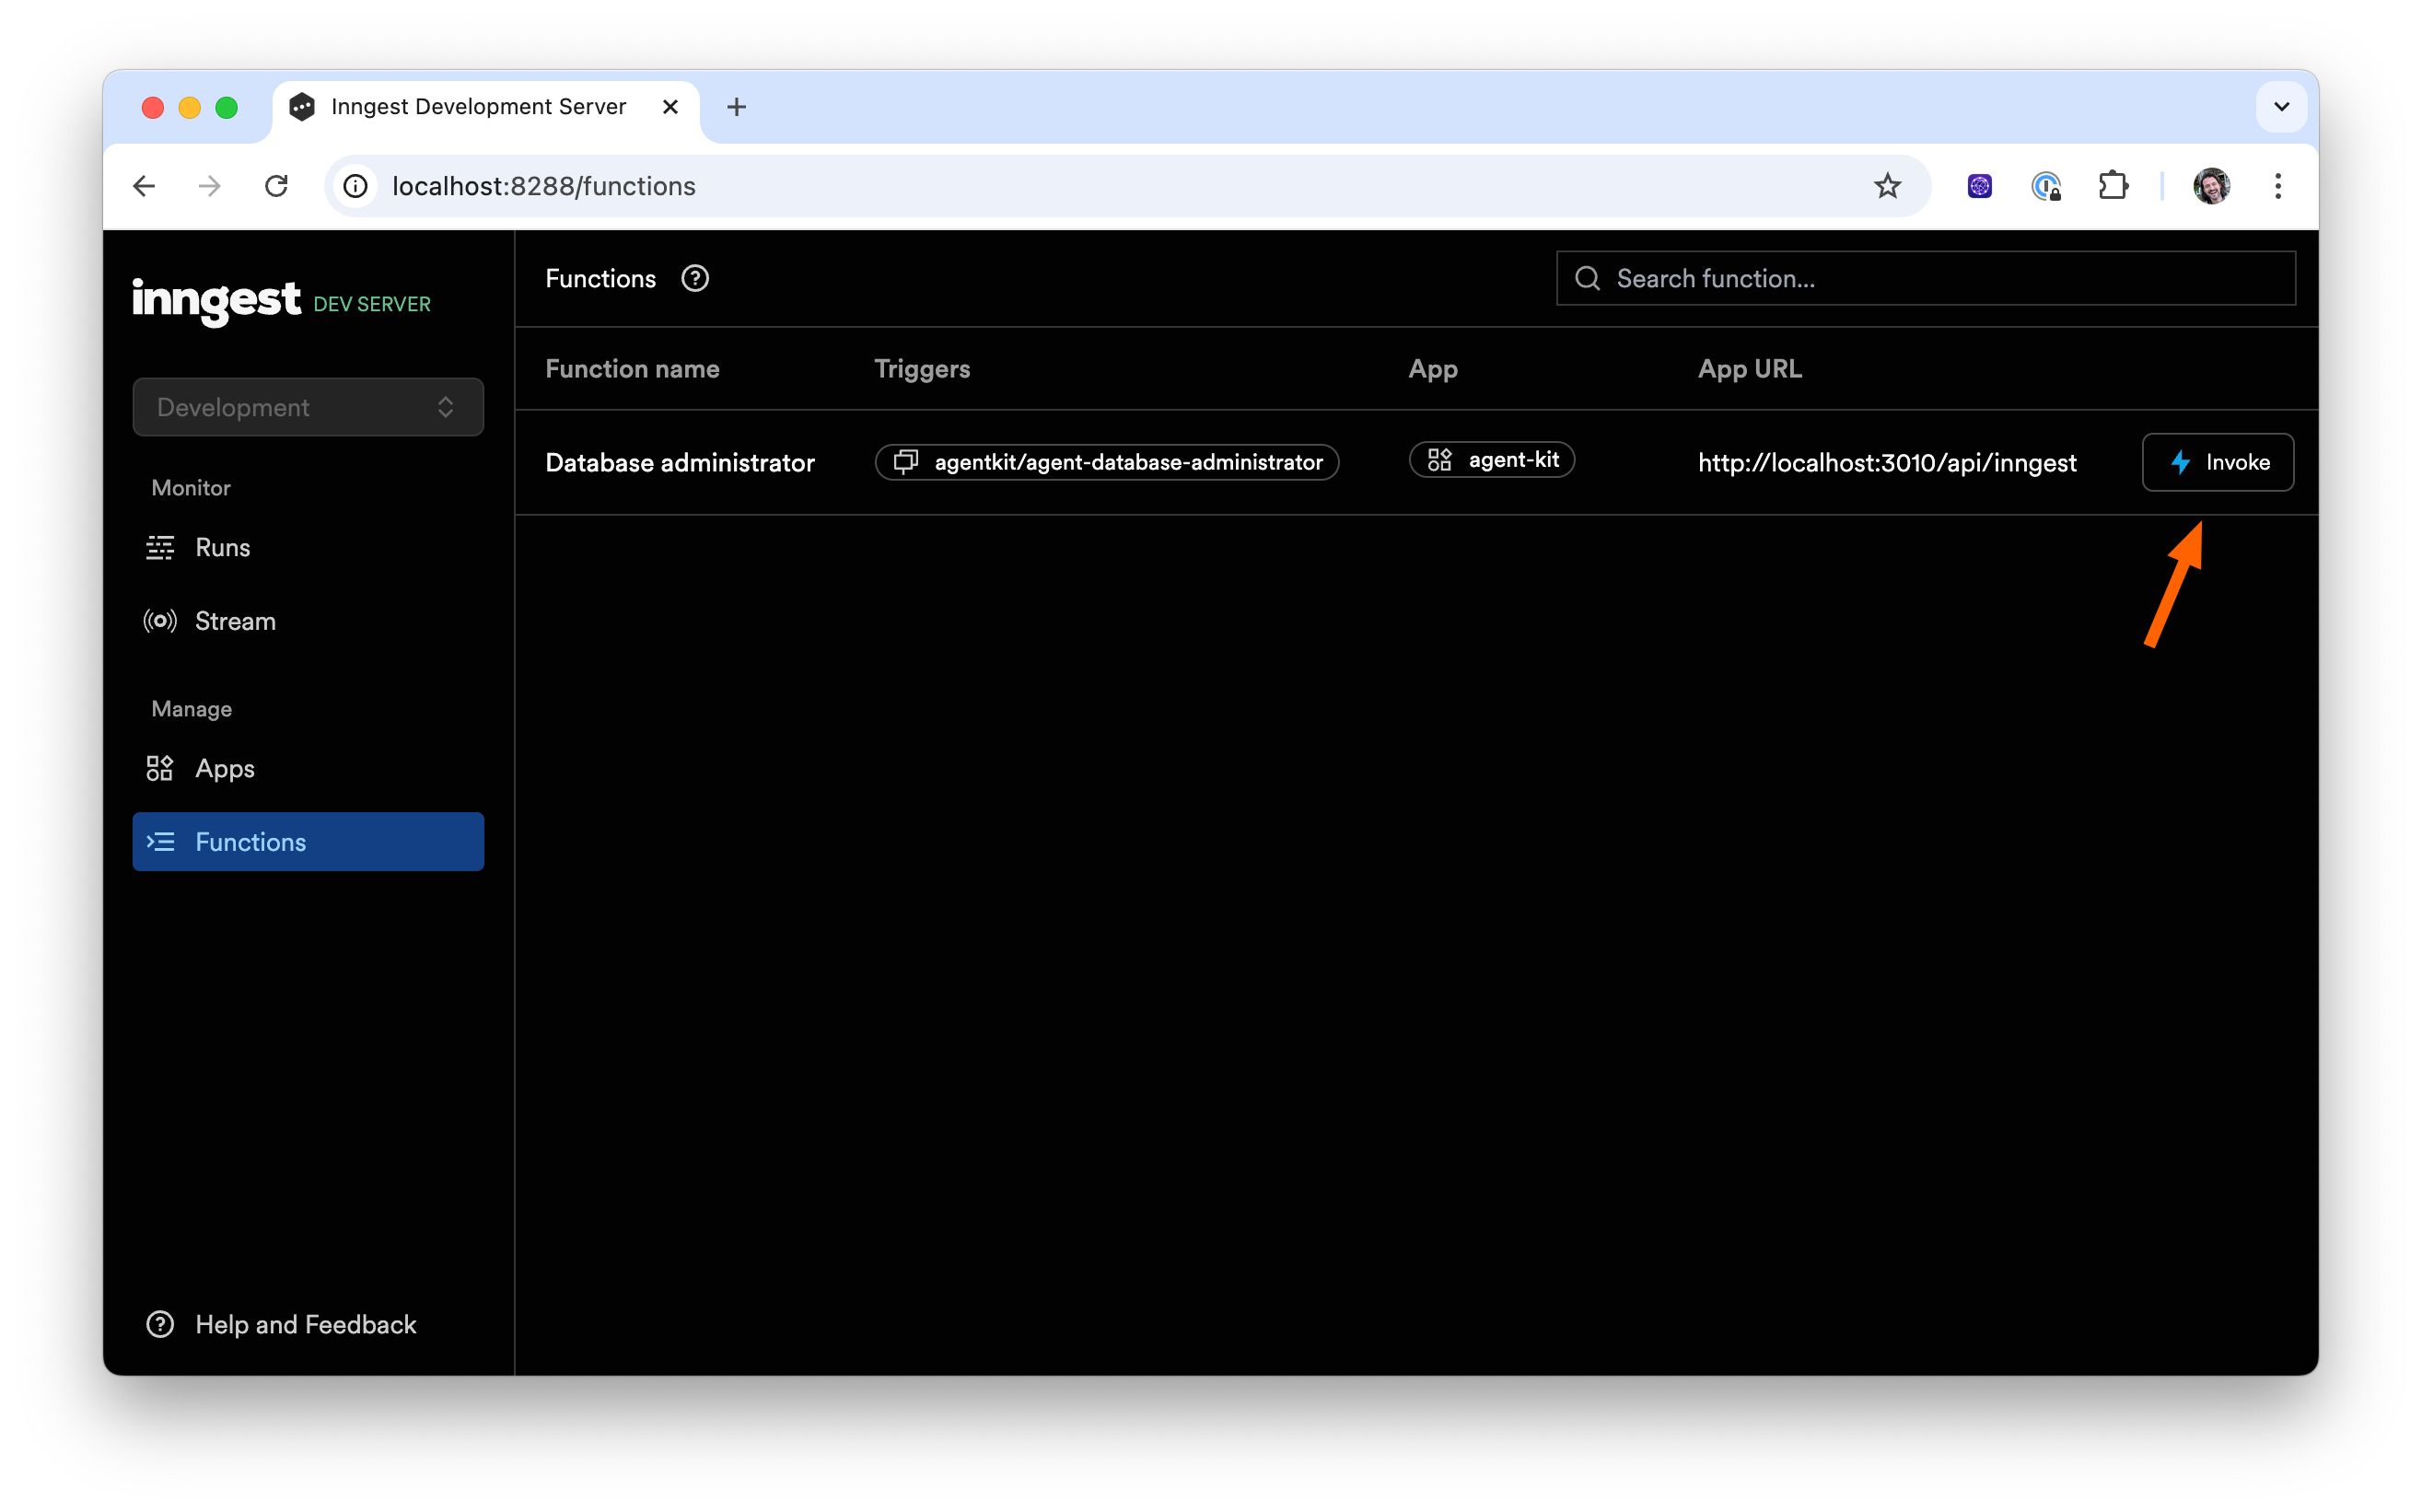
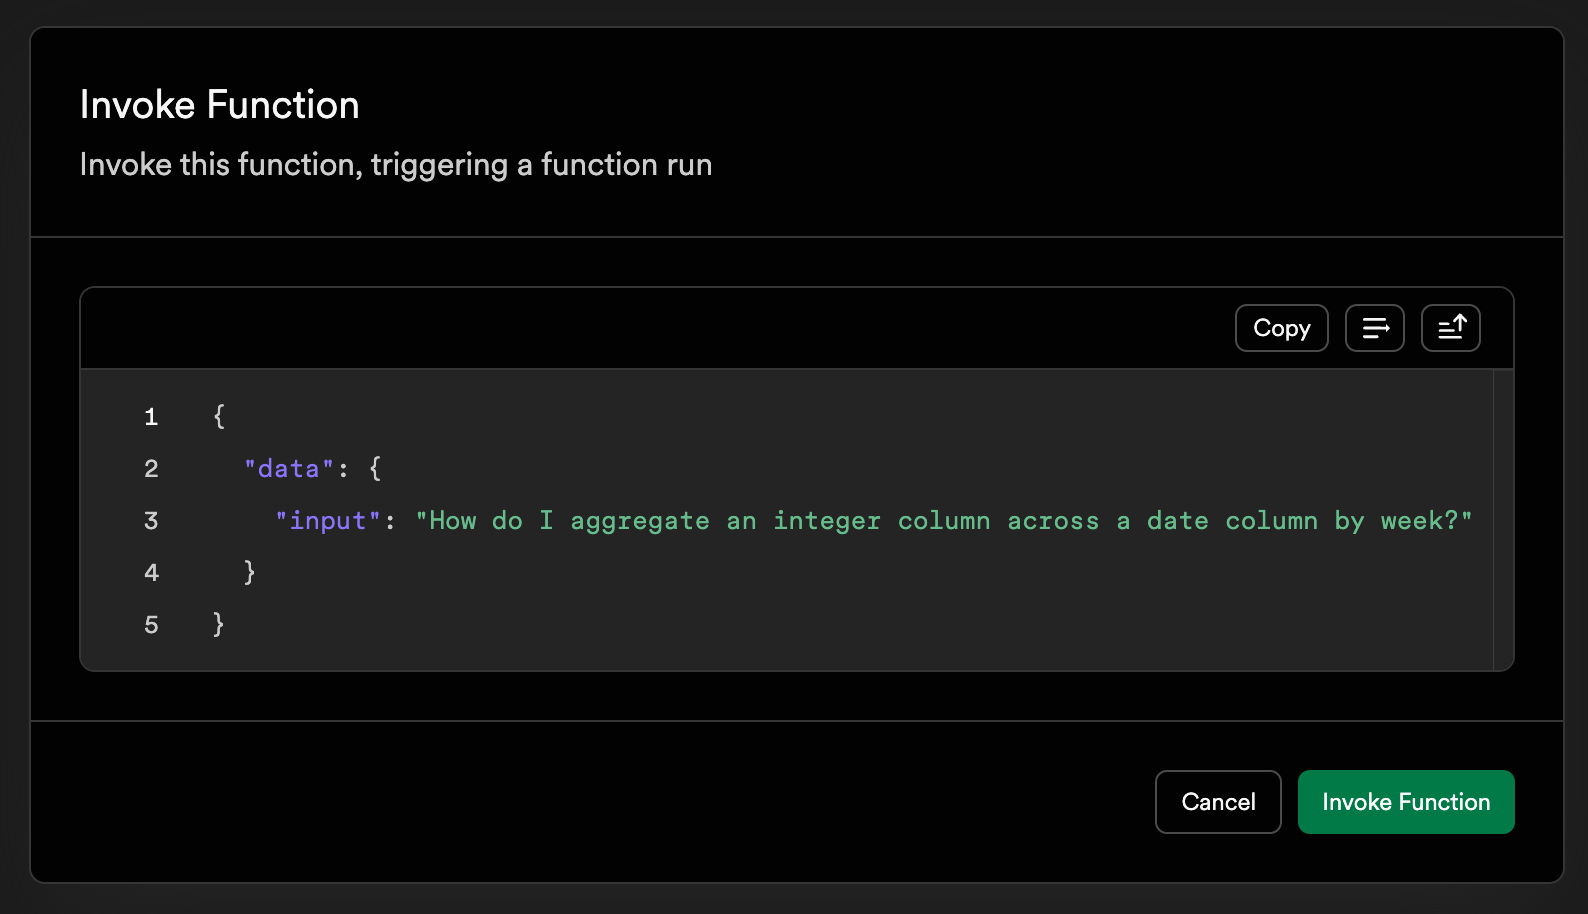
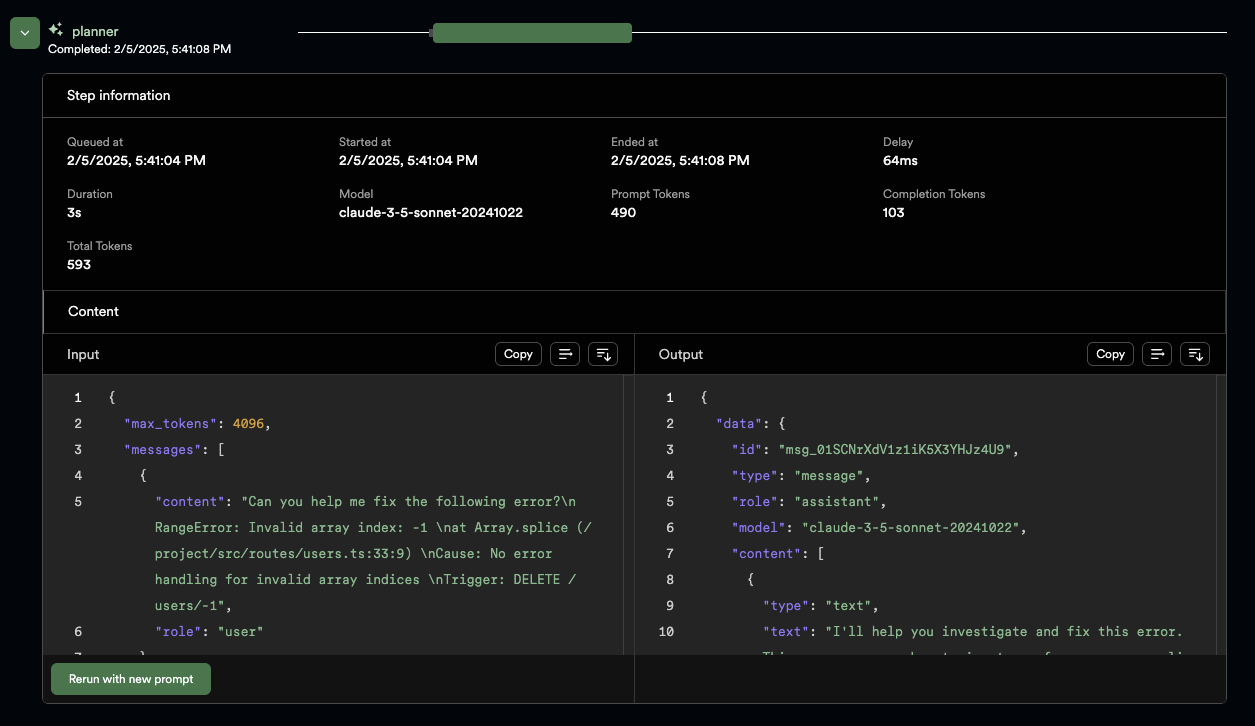
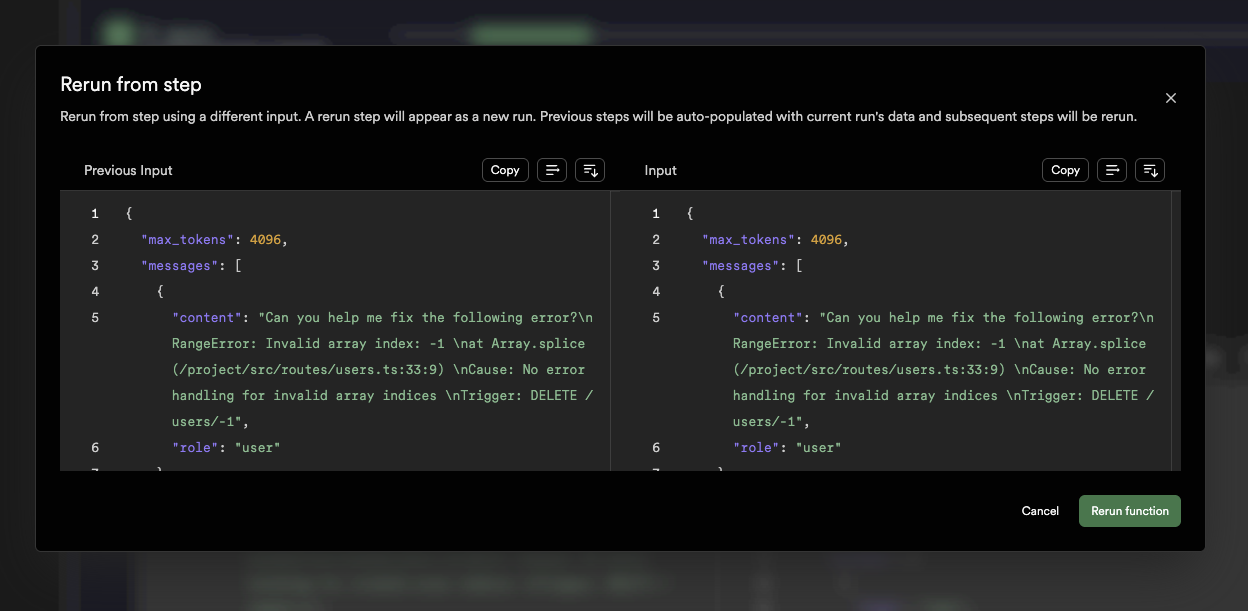
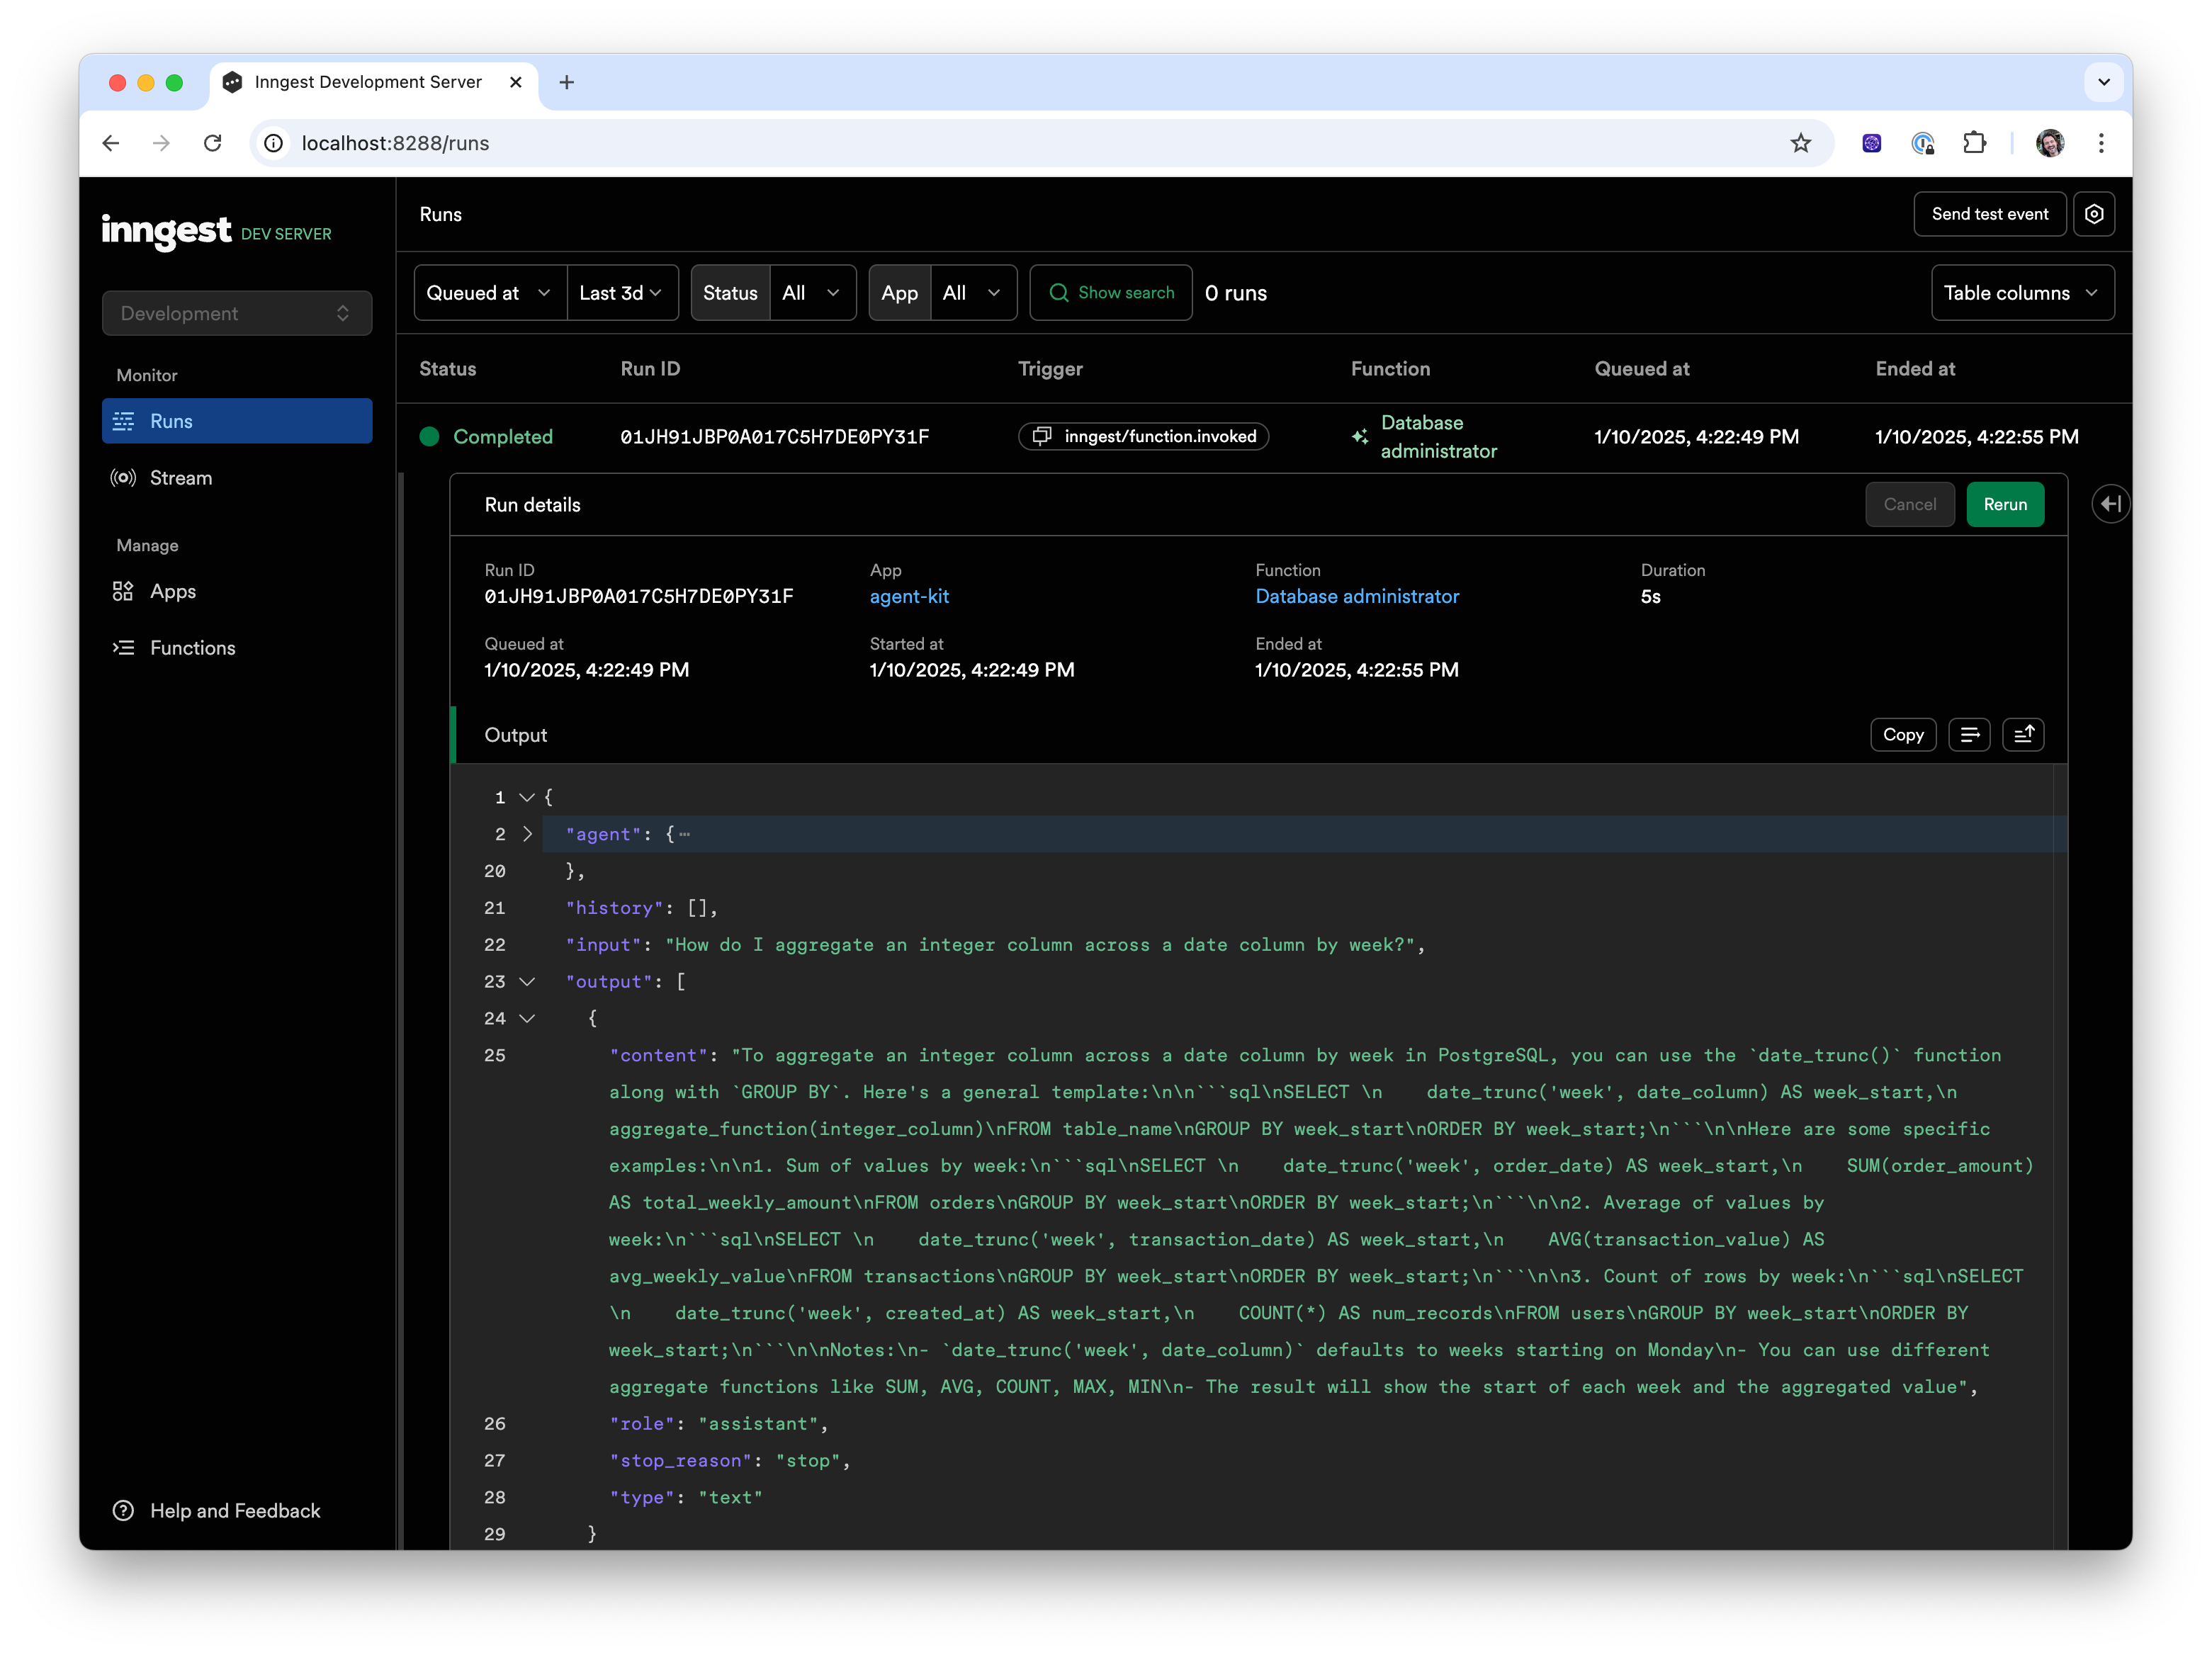
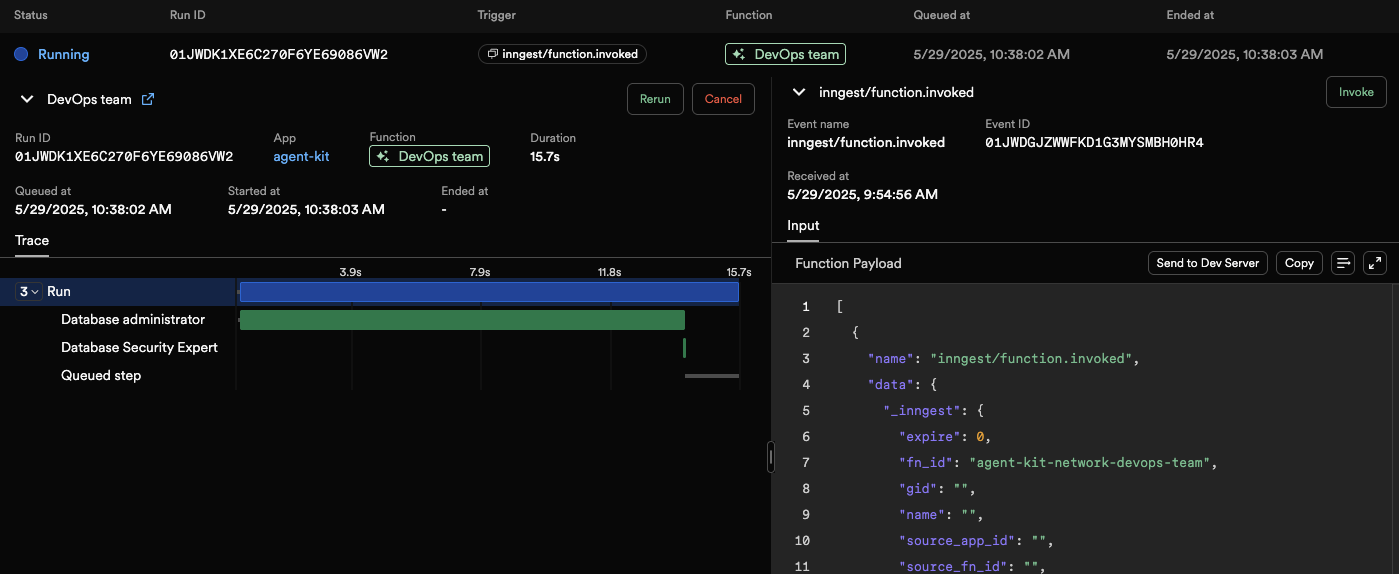
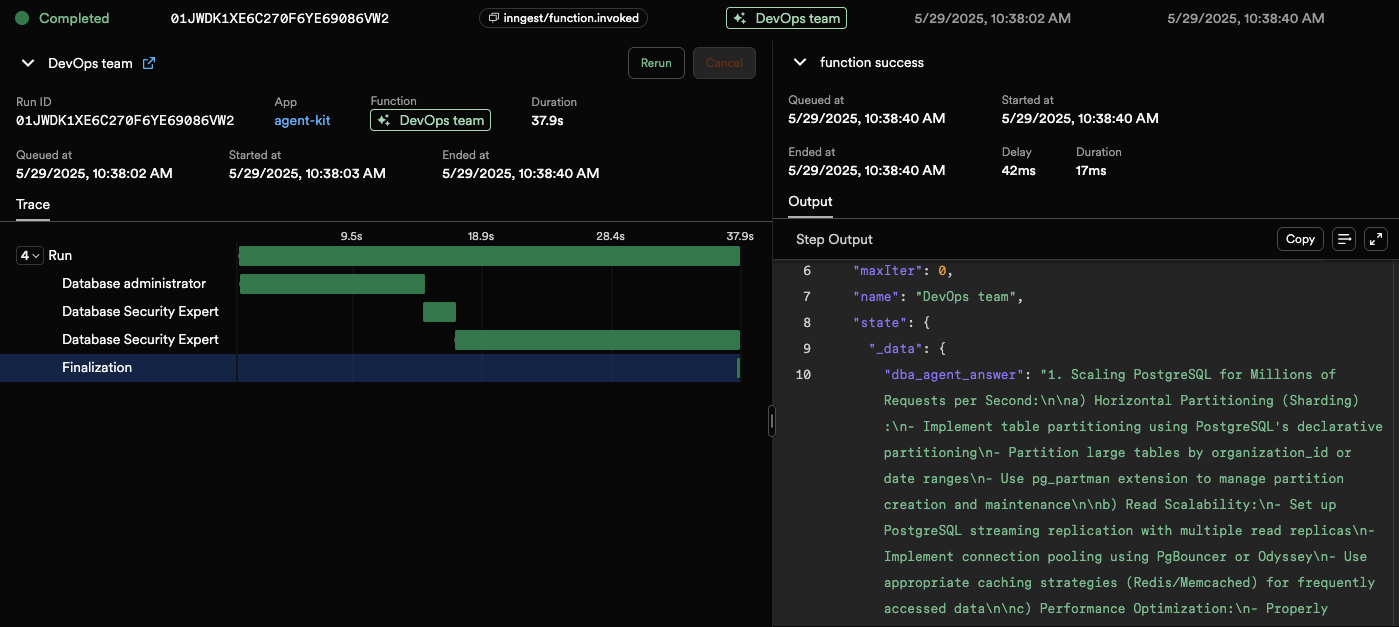
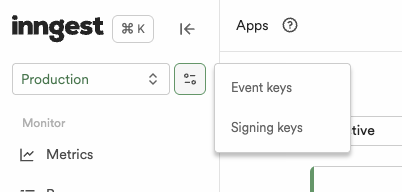
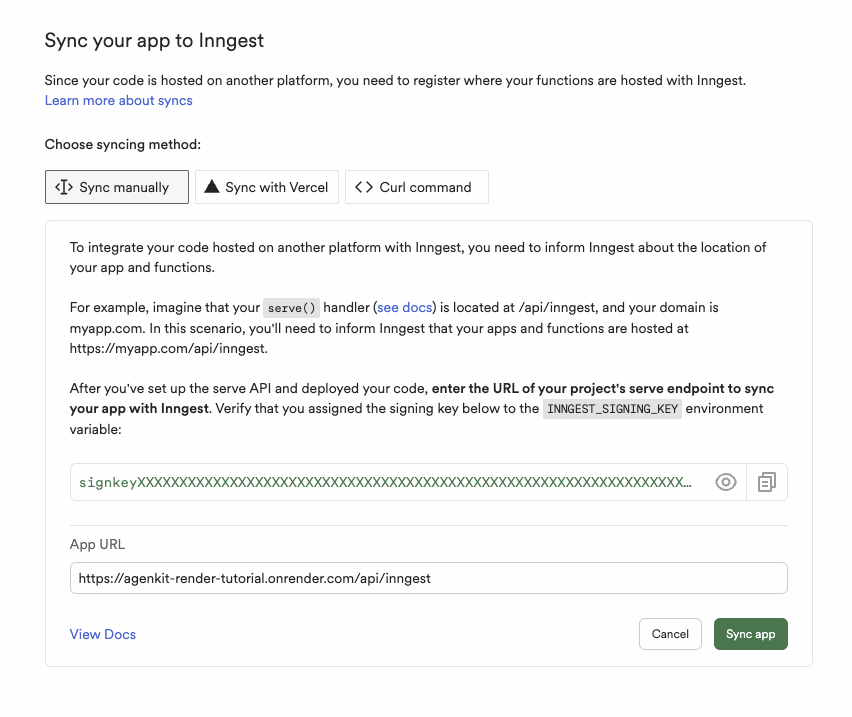
# Human in the Loop Source: https://agentkit.inngest.com/advanced-patterns/human-in-the-loop Enable your Agents to wait for human input. Agents such as Support Agents, Coding or Research Agents might require human oversight. By combining AgentKit with Inngest, you can create [Tools](/concepts/tools) that can wait for human input. ## Creating a "Human in the Loop" tool "Human in the Loop" tools are implemented using Inngest's [`waitForEvent()`](https://www.inngest.com/docs/features/inngest-functions/steps-workflows/wait-for-event) step method: ```ts import { createTool } from "@inngest/agent-kit"; createTool({ name: "ask_developer", description: "Ask a developer for input on a technical issue", parameters: z.object({ question: z.string().describe("The technical question for the developer"), context: z.string().describe("Additional context about the issue"), }), handler: async ({ question, context }, { step }) => { if (!step) { return { error: "This tool requires step context" }; } // Example: Send a Slack message to the developer // Wait for developer response event const developerResponse = await step.waitForEvent("developer.response", { event: "app/support.ticket.developer-response", timeout: "4h", match: "data.ticketId", }); if (!developerResponse) { return { error: "No developer response provided" }; } return { developerResponse: developerResponse.data.answer, responseTime: developerResponse.data.timestamp, }; }, }); ``` The `ask_developer` tool will wait up to 4 hours for a `"developer.response"` event to be received, pausing the execution of the AgentKit network. The incoming `"developer.response"` event will be matched against the `data.ticketId` field of the event that trigger the AgentKit network. For this reason, the AgentKit network will need to be wrapped in an Inngest function as demonstrated in the next section. ## Example: Support Agent with Human in the Loop Let's consider a Support Agent Network automously triaging and solving tickets: ```tsx const customerSupportAgent = createAgent({ name: "Customer Support", description: "I am a customer support agent that helps customers with their inquiries.", system: `You are a helpful customer support agent. Your goal is to assist customers with their questions and concerns. Be professional, courteous, and thorough in your responses.`, model: anthropic({ model: "claude-3-5-haiku-latest", max_tokens: 1000, }), tools: [ searchKnowledgeBase, // ... ], }); const technicalSupportAgent = createAgent({ name: "Technical Support", description: "I am a technical support agent that helps critical tickets.", system: `You are a technical support specialist. Your goal is to help resolve critical tickets. Use your expertise to diagnose problems and suggest solutions. If you need developer input, use the ask_developer tool.`, model: anthropic({ model: "claude-3-5-haiku-latest", max_tokens: 1000, }), tools: [ searchLatestReleaseNotes, // ... ], }); const supervisorRoutingAgent = createRoutingAgent({ // ... }); // Create a network with the agents and default router const supportNetwork = createNetwork({ name: "Support Network", agents: [customerSupportAgent, technicalSupportAgent], defaultModel: anthropic({ model: "claude-3-5-haiku-latest", max_tokens: 1000, }), router: supervisorRoutingAgent, }); ``` You can find the complete example code in the [examples/support-agent-human-in-the-loop](https://github.com/inngest/agent-kit/tree/main/examples/support-agent-human-in-the-loop) directory. To avoid the Support Agent to be stuck or classifying tickets incorrectly, we'll implement a "Human in the Loop" tool to enable a human to add some context. To implement a "Human in the Loop" tool, we'll need to embed our AgentKit network into an Inngest function. ### Transforming your AgentKit network into an Inngest function First, you'll need to create an Inngest Client: ```ts src/inngest/client.ts import { Inngest } from "inngest"; const inngest = new Inngest({ id: "my-agentkit-network", }); ``` Then, transform your AgentKit network into an Inngest function as follows: ```ts src/inngest/agent-network.ts {21-54} import { createAgent, createNetwork, openai } from "@inngest/agent-kit"; import { createServer } from "@inngest/agent-kit/server"; const customerSupportAgent = createAgent({ name: "Customer Support", // .. }); const technicalSupportAgent = createAgent({ name: "Technical Support", // .. }); // Create a network with the agents and default router const supportNetwork = createNetwork({ name: "Support Network", agents: [customerSupportAgent, technicalSupportAgent], // .. }); const supportAgentWorkflow = inngest.createFunction( { id: "support-agent-workflow", }, { event: "app/support.ticket.created", }, async ({ step, event }) => { const ticket = await step.run("get_ticket_details", async () => { const ticket = await getTicketDetails(event.data.ticketId); return ticket; }); if (!ticket || "error" in ticket) { throw new NonRetriableError(`Ticket not found: ${ticket.error}`); } const response = await supportNetwork.run(ticket.title); return { response, ticket, }; } ); // Create and start the server const server = createServer({ functions: [supportAgentWorkflow as any], }); server.listen(3010, () => console.log("Support Agent demo server is running on port 3010") ); ``` The `network.run()` is now performed by the Inngest function. Don't forget to register the function with `createServer`'s `functions` property. ### Add a `ask_developer` tool to the network Our AgentKit network is now ran inside an Inngest function triggered by the `"app/support.ticket.created"` event which carries the `data.ticketId` field. The `Technical Support` Agent will now use the `ask_developer` tool to ask a developer for input on a technical issue: ```ts import { createTool } from "@inngest/agent-kit"; createTool({ name: "ask_developer", description: "Ask a developer for input on a technical issue", parameters: z.object({ question: z.string().describe("The technical question for the developer"), context: z.string().describe("Additional context about the issue"), }), handler: async ({ question, context }, { step }) => { if (!step) { return { error: "This tool requires step context" }; } // Example: Send a Slack message to the developer // Wait for developer response event const developerResponse = await step.waitForEvent("developer.response", { event: "app/support.ticket.developer-response", timeout: "4h", match: "data.ticketId", }); if (!developerResponse) { return { error: "No developer response provided" }; } return { developerResponse: developerResponse.data.answer, responseTime: developerResponse.data.timestamp, }; }, }); ``` Our `ask_developer` tool will now wait for a `"developer.response"` event to be received (ex: from a Slack message), and match it against the `data.ticketId` field. The result of the `ask_developer` tool will be returned to the `Technical Support` Agent. Look at the Inngest [`step.waitForEvent()`](https://www.inngest.com/docs/features/inngest-functions/steps-workflows/wait-for-event) documentation for more details and examples. ### Try it out This Support AgentKit Network is composed of two Agents (Customer Support and Technical Support) and a Supervisor Agent that routes the ticket to the correct Agent. The Technical Support Agent can wait for a developer response when facing complex technical issues. # MCP as tools Source: https://agentkit.inngest.com/advanced-patterns/mcp Provide your Agents with MCP Servers as tools AgentKit supports using [Claude's Model Context Protocol](https://modelcontextprotocol.io/) as tools. Using MCP as tools allows you to use any MCP server as a tool in your AgentKit network, enabling your Agent to access thousands of pre-built tools to interact with. Our integration with [Smithery](https://smithery.ai/) provides a registry of MCP servers for common use cases, with more than 2,000 servers across multiple use cases. ## Using MCP as tools AgentKit supports configuring MCP servers via `SSE` or `WS` transports: ```ts Self-hosted MCP server import { createAgent } from "@inngest/agent-kit"; const neonAgent = createAgent({ name: "neon-agent", system: `You are a helpful assistant that help manage a Neon account. `, mcpServers: [ { name: "neon", transport: { type: "ws", url: "ws://localhost:8080", }, }, ], }); ``` ```ts Smithery MCP server import { createAgent } from "@inngest/agent-kit"; import { createSmitheryUrl } from "@smithery/sdk/config.js"; const smitheryUrl = createSmitheryUrl("https://server.smithery.ai/neon/ws", { neonApiKey: process.env.NEON_API_KEY, }); const neonAgent = createAgent({ name: "neon-agent", system: `You are a helpful assistant that help manage a Neon account. `, mcpServers: [ { name: "neon", transport: { type: "ws", url: smitheryUrl.toString(), }, }, ], }); ``` ## `mcpServers` reference The `mcpServers` parameter allows you to configure Model Context Protocol servers that provide tools for your agent. AgentKit automatically fetches the list of available tools from these servers and makes them available to your agent. An array of MCP server configurations. ### MCP.Server A short name for the MCP server (e.g., "github", "neon"). This name is used to namespace tools for each MCP server. Tools from this server will be prefixed with this name (e.g., "neon-createBranch"). The transport configuration for connecting to the MCP server. ### TransportSSE Specifies that the transport is Server-Sent Events. The URL of the SSE endpoint. Optional configuration for the EventSource. Optional request configuration. ### TransportWebsocket Specifies that the transport is WebSocket. The WebSocket URL of the MCP server. ## Examples This examples shows how to use the [Neon MCP Smithery Server](https://smithery.ai/server/neon/) to build a Neon Assistant Agent that can help you manage your Neon databases.
Agents Tools Network Integrations
Code-based Router
# Multi-steps tools Source: https://agentkit.inngest.com/advanced-patterns/multi-steps-tools Use multi-steps tools to create more complex Agents. In this guide, we'll learn how to create a multi-steps tool that can be used in your AgentKit [Tools](/concepts/tools) to reliably perform complex operations. By combining your AgentKit network with Inngest, each step of your tool will be **retried automatically** and you'll be able to **configure concurrency and throttling**. **Prerequisites** Your AgentKit network [must be configured with Inngest](/getting-started/local-development#1-install-the-inngest-package). ## Creating a multi-steps tool Creating a multi-steps tool is done by creating an Inngest Function that will be used as a tool in your AgentKit network. To create an Inngest Function, you'll need to create an Inngest Client: ```ts src/inngest/client.ts import { Inngest } from 'inngest'; const inngest = new Inngest({ id: 'my-agentkit-network', }); ``` Then, we will implement our AgentKit Tool as an Inngest Function with multiple steps. For example, we'll create a tool that searches for perform a research by crawling the web: ```ts src/inngest/tools/research-web.ts {10, 22, 27} import { inngest } from '../client'; export const researchWebTool = inngest.createFunction({ id: 'research-web-tool', }, { event: "research-web-tool/run" }, async ({ event, step }) => { const { input } = event.data; const searchQueries = await step.ai.infer('generate-search-queries', { model: step.ai.models.openai({ model: "gpt-4o" }), // body is the model request, which is strongly typed depending on the model body: { messages: [{ role: "user", content: `From the given input, generate a list of search queries to perform. \n ${input}`, }], }, }); const searchResults = await Promise.all( searchQueries.map(query => step.run('crawl-web', async (query) => { // perform crawling... }) )); const summary = await step.ai.infer('summarize-search-results', { model: step.ai.models.openai({ model: "gpt-4o" }), body: { messages: [{ role: "user", content: `Summarize the following search results: \n ${searchResults.join('\n')}`, }], }, }); return summary.choices[0].message.content; }); ``` Our `researchWebTool` Inngest defines 3 main steps. * The `step.ai.infer()` call will offload the LLM requests to the Inngest infrastructe which will also handle retries. * The `step.run()` call will run the `crawl-web` step in parallel. All the above steps will be retried automatically in case of failure, resuming the AgentKit network upon completion of the tool. ## Using the multi-steps tool in your AgentKit network We can now add our `researchWebTool` to our AgentKit network: ```ts src/inngest/agent-network.ts {2, 7, 18} import { createAgent, createNetwork, openai } from '@inngest/agent-kit'; import { createServer } from '@inngest/agent-kit/server'; import { researchWebTool } from './inngest/tools/research-web'; const deepResearchAgent = createAgent({ name: 'Deep Research Agent', tools: [researchWebTool], }); const network = createNetwork({ name: 'My Network', defaultModel: openai({ model: "gpt-4o" }), agents: [deepResearchAgent], }); const server = createServer({ networks: [network], functions: [researchWebTool], }); server.listen(3010, () => console.log("Agent kit running!")); ``` We first import our `researchWebTool` function and pass it to the `deepResearchAgent` [`tools` array](/reference/create-agent#param-tools). Finally, we also need to pass the `researchWebTool` function to the `createServer()`'s `functions` array. ## Going further Learn how to configure user-based capacity for your AgentKit network. Learn how to customize the retries of your multi-steps tools. # Configuring Multi-tenancy Source: https://agentkit.inngest.com/advanced-patterns/multitenancy Configure capacity based on users or organizations. As discussed in the [deployment guide](/concepts/deployment), moving an AgentKit network into users' hands requires configuring usage limits. To avoid having one user's usage affect another, you can configure multi-tenancy. Multi-tenancy consists of configuring limits based on users or organizations (*called "tenants"*). It can be easily configured on your AgentKit network using Inngest. **Prerequisites** Your AgentKit network [must be configured with Inngest](/getting-started/local-development#1-install-the-inngest-package). ## Configuring Multi-tenancy Adding multi-tenancy to your AgentKit network is done by transforming your AgentKit network into an Inngest function. ### Transforming your AgentKit network into an Inngest function First, you'll need to create an Inngest Client: ```ts src/inngest/client.ts import { Inngest } from "inngest"; const inngest = new Inngest({ id: "my-agentkit-network", }); ``` Then, transform your AgentKit network into an Inngest function as follows: ```ts src/inngest/agent-network.ts {19-30, 33} import { createAgent, createNetwork, openai } from "@inngest/agent-kit"; import { createServer } from "@inngest/agent-kit/server"; import { inngest } from "./inngest/client"; const deepResearchAgent = createAgent({ name: "Deep Research Agent", tools: [ /* ... */ ], }); const network = createNetwork({ name: "My Network", defaultModel: openai({ model: "gpt-4o" }), agents: [deepResearchAgent], }); const deepResearchNetworkFunction = inngest.createFunction( { id: "deep-research-network", }, { event: "deep-research-network/run", }, async ({ event, step }) => { const { input } = event.data; return network.run(input); } ); const server = createServer({ functions: [deepResearchNetworkFunction], }); server.listen(3010, () => console.log("Agent kit running!")); ``` The `network.run()` is now performed by the Inngest function. Don't forget to register the function with `createServer`'s `functions` property. ### Configuring a concurrency per user We can now configure the capacity by user by adding concurrency and throttling configuration to our Inngest function: ```ts src/inngest/agent-network.ts {8-13} import { createAgent, createNetwork, openai } from '@inngest/agent-kit'; import { createServer } from '@inngest/agent-kit/server'; import { inngest } from './inngest/client'; // network and agent definitions.. const deepResearchNetworkFunction = inngest.createFunction({ id: 'deep-research-network', concurrency: [ { key: "event.data.user_id", limit: 10, }, ], }, { event: "deep-research-network/run" }, async ({ event, step }) => { const { input } = event.data; return network.run(input); }) const server = createServer({ functions: [deepResearchNetworkFunction], }); server.listen(3010, () => console.log("Agent kit running!")); ``` Your AgentKit network will now be limited to 10 concurrent requests per user. The same can be done to add [throttling](https://www.inngest.com/docs/guides/throttling?ref=agentkit-docs-multitenancy), [rate limiting](https://www.inngest.com/docs/guides/rate-limiting?ref=agentkit-docs-multitenancy) or [priority](https://www.inngest.com/docs/guides/priority?ref=agentkit-docs-multitenancy). ## Going further Learn how to customize the retries of your multi-steps tools. # Configuring Retries Source: https://agentkit.inngest.com/advanced-patterns/retries Configure retries for your AgentKit network Agents and Tool calls. Using AgentKit alongside Inngest enables automatic retries for your AgentKit network Agents and Tools calls. The default retry policy is to retry 4 times with exponential backoff and can be configured by following the steps below. **Prerequisites** Your AgentKit network [must be configured with Inngest](/getting-started/local-development#1-install-the-inngest-package). ## Configuring Retries Configuring a custom retry policy is done by transforming your AgentKit network into an Inngest function. ### Transforming your AgentKit network into an Inngest function First, you'll need to create an Inngest Client: ```ts src/inngest/client.ts import { Inngest } from "inngest"; const inngest = new Inngest({ id: "my-agentkit-network", }); ``` Then, transform your AgentKit network into an Inngest function as follows: ```ts src/inngest/agent-network.ts {19-30, 33} import { createAgent, createNetwork, openai } from "@inngest/agent-kit"; import { createServer } from "@inngest/agent-kit/server"; import { inngest } from "./inngest/client"; const deepResearchAgent = createAgent({ name: "Deep Research Agent", tools: [ /* ... */ ], }); const network = createNetwork({ name: "My Network", defaultModel: openai({ model: "gpt-4o" }), agents: [deepResearchAgent], }); const deepResearchNetworkFunction = inngest.createFunction( { id: "deep-research-network", }, { event: "deep-research-network/run", }, async ({ event, step }) => { const { input } = event.data; return network.run(input); } ); const server = createServer({ functions: [deepResearchNetworkFunction], }); server.listen(3010, () => console.log("Agent kit running!")); ``` The `network.run()` is now performed by the Inngest function. Don't forget to register the function with `createServer`'s `functions` property. ### Configuring a custom retry policy We can now configure the capacity by user by adding concurrency and throttling configuration to our Inngest function: ```ts src/inngest/agent-network.ts {8} import { createAgent, createNetwork, openai } from '@inngest/agent-kit'; import { createServer } from '@inngest/agent-kit/server'; import { inngest } from './inngest/client'; // network and agent definitions.. const deepResearchNetworkFunction = inngest.createFunction({ id: 'deep-research-network', retries: 1 }, { event: "deep-research-network/run" }, async ({ event, step }) => { const { input } = event.data; return network.run(input); }) const server = createServer({ functions: [deepResearchNetworkFunction], }); server.listen(3010, () => console.log("Agent kit running!")); ``` Your AgentKit network will now retry once on any failure happening during a single execution cycle of your network. ## Going further Learn how to configure user-based capacity for your AgentKit network. # Deterministic state routing Source: https://agentkit.inngest.com/advanced-patterns/routing State based routing in Agent Networks State based routing is a deterministic approach to managing agent workflows, allowing for more reliable, testable, and maintainable AI agent systems. This documentation covers the core concepts and implementation details based on the Inngest AgentKit framework. ## Core Concepts State based routing models agent workflows as a state machine where: * Each agent has a specific goal within a larger network * The network combines agents to achieve an overall objective, with shared state modified by each agent * The network's router inspects state and determines which agent should run next * The network runs in a loop, calling the router on each iteration until all goals are met * Agents run with updated conversation history and state on each loop iteration ## Benefits Unlike fully autonomous agents that rely on complex prompts to determine their own actions, state based routing: * Makes agent behavior more predictable * Simplifies testing and debugging * Allows for easier identification of failure points * Provides clear separation of concerns between agents ## Implementation Structure A state based routing system consists of: 1. State Definition Define structured data that represents the current progress of your workflow: ```typescript export interface AgentState { // files stores all files that currently exist in the repo. files?: string[]; // plan is the plan created by the planning agent. It is optional // as, to begin with, there is no plan. This is set by the planning // agent's tool. plan?: { thoughts: string; plan_details: string; edits: Array<{ filename: string; idea: string; reasoning: string; }>; }, // done indicates whether we're done editing files, and terminates the // network when true. done: boolean; } ``` 2. Network and router implementation Create a router function that inspects state and returns the appropriate agent: ```typescript export const codeWritingNetwork = createNetwork({ name: "Code writing network", agents: [], // We'll add these soon. router: ({ network }): Agent | undefined => { // The router inspects network state to figure out which agent to call next. if (network.state.data.done) { // We're done editing. This is set when the editing agent finishes // implementing the plan. // // At this point, we could hand off to another agent that tests, critiques, // and validates the edits. For now, return undefined to signal that // the network has finished. return; } // By default, there is no plan and we should use the planning agent to read and // understand files. The planning agent's `create_plan` tool modifies state once // it's gathered enough context, which will then cause the router loop to pass // to the editing agent below. if (network.state.data.plan === undefined) { return planningAgent; } // There is a plan, so switch to the editing agent to begin implementing. // // This lets us separate the concerns of planning vs editing, including using differing // prompts and tools at various stages of the editing process. return editingAgent; } } ``` A router has the following definition: ```typescript // T represents the network state's type. type RouterFunction = (args: { input: string; network: NetworkRun; stack: Agent[]; callCount: number; lastResult?: InferenceResult; }) => Promise | undefined>; ``` The router has access to: * `input`: The original input string passed to the network * `network`: The current network run instance with state * `stack`: Array of pending agents to be executed * `callCount`: Number of agent invocations made * `lastResult`: The most recent inference result from the last agent execution 3. Agent Definition Define agents with specific goals and tools. Tools modify the network's state. For example, a classification agent may have a tool which updates the state's `classification` property, so that in the next network loop we can determine which new agent to run for the classified request. ```typescript // This agent accepts the network state's type, so that tools are properly typed and can // modify state correctly. export const planningAgent = createAgent({ name: "Planner", description: "Plans the code to write and which files should be edited", tools: [ listFilesTool, createTool({ name: "create_plan", description: "Describe a formal plan for how to fix the issue, including which files to edit and reasoning.", parameters: z.object({ thoughts: z.string(), plan_details: z.string(), edits: z.array( z.object({ filename: z.string(), idea: z.string(), reasoning: z.string(), }) ), }), handler: async (plan, opts: Tool.Options) => { // Store this in the function state for introspection in tracing. await opts.step?.run("plan created", () => plan); if (opts.network) { opts.network.state.data.plan = plan; } }, }), ], // Agent prompts can also inspect network state and conversation history. system: ({ network }) => ` You are an expert Python programmer working on a specific project: ${network?.state.data.repo}. You are given an issue reported within the project. You are planning how to fix the issue by investigating the report, the current code, then devising a "plan" - a spec - to modify code to fix the issue. Your plan will be worked on and implemented after you create it. You MUST create a plan to fix the issue. Be thorough. Think step-by-step using available tools. Techniques you may use to create a plan: - Read entire files - Find specific classes and functions within a file `, }); ``` ## Execution Flow When the network runs: * The network router inspects the current state * It returns an agent to run based on state conditions (or undefined to quit) * The agent executes with access to previous conversation history, current state, and tools * Tools update the state with new information * The router runs again with updated state and conversation history * This continues until the router returns without an agent (workflow complete) ## Best Practices * **Keep agent goals focused and specific**: Each agent should have a specific goal, and your network should combine agents to solve a larger problem. This makes agents easy to design and test, and it makes routing logic far easier. * **Design state to clearly represent workflow progress**: Moving state out of conversation history and into structured data makes debugging agent workflows simple. * **Use tools to update state in a structured way**: Tools allow you to extract structured data from agents and modify state, making routing easy. * **Implement iteration limits to prevent infinite loops**: The router has a `callCount` parameter allowing you to quit early. ## Error Handling When deployed to [Ingnest](https://www.inngest.com), AgentKit provides built-in error handling: * Automatic retries for failed agent executions * State persistence between retries * Ability to inspect state at any point in the workflow * Tracing capabilities for debugging # Changelog Source: https://agentkit.inngest.com/changelog/overview Recent releases, new features, and fixes. * Introducing support for [Grok models](/reference/model-grok) * Adding support for [Gemini latest models](/reference/model-gemini) * Add support for model hyper params (ex: temperature, top\_p, etc) * Breaking change: `anthropic()` `max_tokens` options has been moved in `defaultParameters` * Add support OpenAI o3-mini, gpt-4.5, and more * [Integration with Browserbase](/integrations/browserbase) * remove `server` export to allow non-Node runtimes * allow tools with no parameters * [Integration with E2B Code Interpreter](/integrations/e2b) * Allow specifying [Inngest functions as tools](/advanced-patterns/multi-steps-tools) * Inngest is now an optional dependency * Fixed OpenAI adapter to safely parse non-string tool return values for Function calling * Various documentation improvements * Added support for Model Context Protocol (MCP) tool calling * Added basic development server * Fixed Anthropic model to ensure proper message handling * Improved code samples and concepts documentation * Added comprehensive quick start guide * Fixed bundling issues * Improved model exports for better discovery * Various cross-platform compatibility improvements * Fixed state reference handling in agents * Updated SWEBench example configuration * Various stability improvements * Fixed network to agent state propagation in run * Improved git clone handling in SWEBench example * Various minor improvements * Initial release of AgentKit * Core framework implementation with lifecycle management * Support for OpenAI and Anthropic models * Network and Agent architecture with state management * ReAct implementation for networks * Tool calling support for agents * Added SWEBench example * Comprehensive documentation structure * Stepless model/network/agent instantiations # Agents Source: https://agentkit.inngest.com/concepts/agents Create agents to accomplish specific tasks with tools inside a network. Agents are the core of AgentKit. Agents are *stateless* entities with a defined goal and an optional set of [Tools](/concepts/tools) that can be used to accomplish a goal. Agents can be called individually or, more powerfully, composed into a [Network](/concepts/networks) with multiple agents that can work together with persisted [State](/concepts/state). At the most basic level, an Agent is a wrapper around a specific provider's [model](/concepts/models), OpenAI gpt-4 for example, and a set of of [tools](/concepts/tools). ## Creating an Agent To create a simple Agent, all that you need is a `name`, `system` prompt and a `model`. All configuration options are detailed in the `createAgent` [reference](/reference/agent). Here is a simple agent created using the `createAgent` function: ```ts import { createAgent, openai } from '@inngest/agent-kit'; const codeWriterAgent = createAgent({ name: 'Code writer', system: 'You are an expert TypeScript programmer. Given a set of asks, you think step-by-step to plan clean, ' + 'idiomatic TypeScript code, with comments and tests as necessary.' + 'Do not respond with anything else other than the following XML tags:' + '- If you would like to write code, add all code within the following tags (replace $filename and $contents appropriately):' + " $contents", model: openai('gpt-4o-mini'), }); ``` While `system` prompts can be static strings, they are more powerful when they are [dynamic system prompts](#dynamic-system-prompts) defined as callbacks that can add additional context at runtime. Any Agent can be called using `run()` with a user prompt. This performs an inference call to the model with the system prompt as the first message and the input as the user message. ```ts const { output } = codeWriterAgent.run( 'Write a typescript function that removes unnecessary whitespace', ); console.log(output); // [{ role: 'assistant', content: 'function removeUnecessaryWhitespace(...' }] ``` When including your Agent in a Network, a `description` is required. Learn more about [using Agents in Networks here](#using-agents-in-networks). {/* TODO - Compare to OpenAI sdk call */} {/* TODO - When combined with Inngest's step.ai...expand */} ## Adding tools [Tools](/concepts/tools) are functions that extend the capabilities of an Agent. Along with the prompt (see `run()`), Tools are included in calls to the language model through features like OpenAI's "[function calling](https://platform.openai.com/docs/guides/function-calling)" or Claude's "[tool use](https://docs.anthropic.com/en/docs/build-with-claude/tool-use)." Tools are defined using the `createTool` function and are passed to agents via the `tools` parameter: ```ts import { createAgent, createTool, openai } from '@inngest/agent-kit'; const listChargesTool = createTool({ name: 'list_charges', description: "Returns all of a user's charges. Call this whenever you need to find one or more charges between a date range.", parameters: z.array( z.object({ userId: z.string(), }), ), handler: async (output, { network, agent, step }) => { // output is strongly typed to match the parameter type. }, }); const supportAgent = createAgent({ name: 'Customer support specialist', system: 'You are an customer support specialist...', model: openai('gpt-3.5-turbo'), tools: [listChargesTool], }); ``` When `run()` is called, any step that the model decides to call is immediately executed before returning the output. Read the "[How agents work](#how-agents-work)" section for additional information. Learn more about Tools in [this guide](/concepts/tools). ## How Agents work Agents themselves are relatively simple. When you call `run()`, there are several steps that happen: The initial messages are created using the `system` prompt, the `run()` user prompt, and [Network State](/concepts/network-state), if the agent is part of a [Network](/concepts/networks). For added control, you can dynamically modify the Agent's prompts before the next step using the `onStart` [lifecycle hook](#lifecycle-hooks). {/* TODO - Update this when Inngest isn't a requirement */} An inference call is made to the provided [`model`](/concepts/models) using Inngest's [`step.ai`](https://www.inngest.com/docs/features/inngest-functions/steps-workflows/step-ai-orchestration#step-tools-step-ai). `step.ai` automatically retries on failure and caches the result for durability. The result is parsed into an `InferenceResult` object that contains all messages, tool calls and the raw API response from the model. To modify the result prior to calling tools, use the optional `onResponse` [lifecycle hook](#lifecycle-hooks). If the model decides to call one of the available `tools`, the Tool is automatically called. After tool calling is complete, the `onFinish` [lifecycle hook](#lifecycle-hooks) is called with the updated `InferenceResult`. This enables you to modify or inspect the output of the called tools. The result is returned to the caller. ### Lifecycle hooks Agent lifecycle hooks can be used to intercept and modify how an Agent works enabling dynamic control over the system: ```tsx import { createAgent, openai } from '@inngest/agent-kit'; const agent = createAgent({ name: 'Code writer', description: 'An expert TypeScript programmer which can write and debug code.', system: '...', model: openai('gpt-3.5-turbo'), lifecycle: { onStart: async ({ prompt, network: { state }, history }) => { // Dynamically alter prompts using Network state and history. return { prompt, history } }, }, }); ``` As mentioned in the "[How Agents work](#how-agents-work)" section, there are a few lifecycle hooks that can be defined on the Agent's `lifecycle` options object. * Dynamically alter prompts using Network [State](/concepts/state) or the Network's history. * Parse output of model after an inference call. Learn more about lifecycle hooks and how to define them in [this reference](/reference/create-agent#lifecycle). ## System prompts An Agent's system prompt can be defined as a string or an async callback. When Agents are part of a [Network](/concepts/networks), the Network [State](/concepts/state) is passed as an argument to create dynamic prompts, or instructions, based on history or the outputs of other Agents. ### Dynamic system prompts Dynamic system prompts are very useful in agentic workflows, when multiple models are called in a loop, prompts can be adjusted based on network state from other call outputs. ```ts const agent = createAgent({ name: 'Code writer', description: 'An expert TypeScript programmer which can write and debug code.', // The system prompt can be dynamically created at runtime using Network state: system: async ({ network }) => { // A default base prompt to build from: const basePrompt = 'You are an expert TypeScript programmer. ' + 'Given a set of asks, think step-by-step to plan clean, ' + 'idiomatic TypeScript code, with comments and tests as necessary.'; // Inspect the Network state, checking for existing code saved as files: const files: Record | undefined = network.state.data.files; if (!files) { return basePrompt; } // Add the files from Network state as additional context automatically let additionalContext = 'The following code already exists:'; for (const [name, content] of Object.entries(files)) { additionalContext += `${content}`; } return `${basePrompt} ${additionalContext}`; }, }); ``` ### Static system prompts Agents may also just have static system prompts which are more useful for simpler use cases. ```ts const codeWriterAgent = createAgent({ name: 'Copy editor', system: `You are an expert copy editor. Given a draft article, you provide ` + `actionable improvements for spelling, grammar, punctuation, and formatting.`, model: openai('gpt-3.5-turbo'), }); ``` ## Using Agents in Networks Agents are the most powerful when combined into [Networks](/concepts/networks). Networks include [state](/concepts/state) and [routers](/concepts/routers) to create stateful workflows that can enable Agents to work together to accomplish larger goals. ### Agent descriptions Similar to how [Tools](/concepts/tools) have a `description` that enables an LLM to decide when to call it, Agents also have an `description` parameter. This is *required* when using Agents within Networks. Here is an example of an Agent with a description: ```ts const codeWriterAgent = createAgent({ name: 'Code writer', description: 'An expert TypeScript programmer which can write and debug code. Call this when custom code is required to complete a task.', system: `...`, model: openai('gpt-3.5-turbo'), }); ``` # Deployment Source: https://agentkit.inngest.com/concepts/deployment Deploy your AgentKit networks to production. Deploying an AgentKit network to production is straightforward but there are a few things to consider: * **Scalability**: Your Network Agents rely on tools which interact with external systems. You'll need to ensure that your deployment environment can scale to handle the requirements of your network. * **Reliability**: You'll need to ensure that your AgentKit network can handle failures and recover gracefully. * **Multitenancy**: You'll need to ensure that your AgentKit network can handle multiple users and requests concurrently without compromising on performance or security. All the above can be easily achieved by using Inngest alongside AgentKit. By installing the Inngest SDK, your AgentKit network will automatically benefit from: * [**Multitenancy support**](/advanced-patterns/multitenancy) with fine grained concurrency and throttling configuration * **Retrieable and [parallel tool calls](/advanced-patterns/retries)** for reliable and performant tool usage * **LLM requests offloading** to improve performance and reliability for Serverless deployments * **Live and detailed observability** with step-by-step traces including the Agents inputs/outputs and token usage You will find below instructions to configure your AgentKit network deployment with Inngest. ## Deploying your AgentKit network with Inngest Deploying your AgentKit network with Inngest to benefit from automatic retries, LLM requests offloading and live observability only requires a few steps: ### 1. Install the Inngest SDK ```shell npm npm install inngest ``` ```shell pnpm pnpm install inngest ``` ```shell yarn yarn add inngest ``` ### 2. Serve your AgentKit network over HTTP Update your AgentKit network to serve over HTTP as follows: ```ts {1, 8-13} import { createNetwork } from '@inngest/agent-kit'; import { createServer } from '@inngest/agent-kit/server'; const network = createNetwork({ name: 'My Network', agents: [/* ... */], }); const server = createServer({ networks: [network], }); server.listen(3010, () => console.log("Agent kit running!")); ``` ### 3. Deploy your AgentKit network **Configuring environment variables** [Create an Inngest account](https://www.inngest.com/?ref=agentkit-docs-deployment) and open the top right menu to access your Event Key and Signing Key: ![Inngest Event Key and Signing Key](https://mintlify.s3.us-west-1.amazonaws.com/inngest/graphics/concepts/deployment/inngest-event-and-signing-keys.png) Then configure the following environment variables into your deployment environment (*ex: AWS, Vercel, GCP*): * `INNGEST_API_KEY`: Your Event Key * `INNGEST_SIGNING_KEY`: Your Signing Key **Deploying your AgentKit network** You can now deploy your AgentKit network to your preferred cloud provider. Once deployed, copy the deployment URL for the final configuration step. ### 4. Sync your AgentKit network with the Inngest Platform On your Inngest dashboard, click on the "Sync new app" button at the top right of the screen. Then, paste the deployment URL into the "App URL" by adding `/api/inngest` to the end of the URL: ![Inngest Event Key and Signing Key](https://mintlify.s3.us-west-1.amazonaws.com/inngest/graphics/concepts/deployment/inngest-sync-app.png) **You sync is failing?** Read our [troubleshooting guide](https://www.inngest.com/docs/apps/cloud?ref=agentkit-docs-deployment#troubleshooting) for more information. Once the sync succeeds, you can navigate to the *Functions* tabs where you will find your AgentKit network: ![Inngest Event Key and Signing Key](https://mintlify.s3.us-west-1.amazonaws.com/inngest/graphics/concepts/deployment/inngest-functions-tab.png) Your AgentKit network can now be triggered manually from the Inngest Dashboard or [from your app using `network.run()`](/concepts/networks). {/* ## Configuring Parallel tool calls, Multitenancy and Retries */} ## Configuring Multitenancy and Retries {/* Learn how to run multiple tools in parallel. */} Configure usage limits based on users or organizations. Learn how to configure retries for your AgentKit Agents and Tools. # Models Source: https://agentkit.inngest.com/concepts/models Leverage different provider's models across Agents. Within AgentKit, models are adapters that wrap a given provider (ex. OpenAI, Anthropic)'s specific model version (ex. `gpt-3.5`). Each [Agent](/concepts/agents) can each select their own model to use and a [Network](/concepts/networks) can select a default model. ```ts import { openai, anthropic, gemini } from "@inngest/agent-kit"; ``` ## How to use a model ### Create a model instance Each model helper will first try to get the API Key from the environment variable. The API Key can also be provided with the `apiKey` option to the model helper. ```ts OpenAI import { openai, createAgent } from "@inngest/agent-kit"; const model = openai({ model: "gpt-3.5-turbo" }); const modelWithApiKey = openai({ model: "gpt-3.5-turbo", apiKey: "sk-..." }); ``` ```ts Anthropic import { anthropic, createAgent } from "@inngest/agent-kit"; const model = anthropic({ model: "claude-3-5-haiku-latest" }); const modelWithBetaFlags = anthropic({ model: "claude-3-5-haiku-latest", betaHeaders: ["prompt-caching-2024-07-31"], }); const modelWithApiKey = anthropic({ model: "claude-3-5-haiku-latest", apiKey: "sk-...", // Note: max_tokens is required for Anthropic models defaultParameters: { max_tokens: 4096 }, }); ``` ```ts Gemini import { gemini, createAgent } from "@inngest/agent-kit"; const model = gemini({ model: "gemini-1.5-flash" }); ``` ### Configure model hyper parameters (temperature, etc.) You can configure the model hyper parameters (temperature, etc.) by passing the `defaultParameters` option: ```ts OpenAI import { openai, createAgent } from "@inngest/agent-kit"; const model = openai({ model: "gpt-3.5-turbo", defaultParameters: { temperature: 0.5 }, }); ``` ```ts Anthropic import { anthropic, createAgent } from "@inngest/agent-kit"; const model = anthropic({ model: "claude-3-5-haiku-latest", defaultParameters: { temperature: 0.5, max_tokens: 4096 }, }); ``` ```ts Gemini import { gemini, createAgent } from "@inngest/agent-kit"; const model = gemini({ model: "gemini-1.5-flash", defaultParameters: { temperature: 0.5 }, }); ``` The full list of hyper parameters can be found in the [types definition of each model](https://github.com/inngest/inngest-js/tree/main/packages/ai/src/models). ### Providing a model instance to an Agent ```ts import { createAgent } from "@inngest/agent-kit"; const supportAgent = createAgent({ model: openai("gpt-3.5-turbo"), name: "Customer support specialist", system: "You are an customer support specialist...", tools: [listChargesTool], }); ``` ### Providing a model instance to a Network The provided `defaultModel` will be used for all Agents without a model specified. It will also be used by the "[Default Routing Agent](/concepts/routers#default-routing-agent-autonomous-routing)" if enabled. ```ts import { createNetwork } from "@inngest/agent-kit"; const network = createNetwork({ agents: [supportAgent], defaultModel: openai("gpt-4o"), }); ``` ## List of supported models For a full list of supported models, you can always check [the models directory here](https://github.com/inngest/inngest-js/tree/main/packages/ai/src/models). ```plaintext OpenAI "gpt-4.5-preview" "gpt-4o" "chatgpt-4o-latest" "gpt-4o-mini" "gpt-4" "o1" "o1-preview" "o1-mini" "o3-mini" "gpt-4-turbo" "gpt-3.5-turbo" ``` ```plaintext Anthropic "claude-3-5-haiku-latest" "claude-3-5-haiku-20241022" "claude-3-5-sonnet-latest" "claude-3-5-sonnet-20241022" "claude-3-5-sonnet-20240620" "claude-3-opus-latest" "claude-3-opus-20240229" "claude-3-sonnet-20240229" "claude-3-haiku-20240307" "claude-2.1" "claude-2.0" "claude-instant-1.2"; ``` ```plaintext Gemini "gemini-1.5-flash" "gemini-1.5-flash-8b" "gemini-1.5-pro" "gemini-1.0-pro" "text-embedding-004" "aqa" ``` ```plaintext Grok "grok-2-1212" "grok-2" "grok-2-latest" "grok-3" "grok-3-latest" ``` ### Environment variable used for each model provider * OpenAI: `OPENAI_API_KEY` * Anthropic: `ANTHROPIC_API_KEY` * Gemini: `GEMINI_API_KEY` * Grok: `XAI_API_KEY` ## Contribution Is there a model that you'd like to see included in AgentKit? Open an issue, create a pull request, or chat with the team on [Discord in the #ai channel](https://www.inngest.com/community). Fork, clone, and open a pull request. # Networks Source: https://agentkit.inngest.com/concepts/networks Combine one or more agents into a Network. Networks are **Systems of [Agents](/concepts/agents)**. Use Networks to create powerful AI workflows by combining multiple Agents. A network contains three components: * The [Agents](/concepts/agents) that the network can use to achieve a goal * A [State](/concepts/state) including past messages and a key value store, shared between Agents and the Router * A [Router](/concepts/routers), which chooses whether to stop or select the next agent to run in the loop Here's a simple example: ```tsx import { createNetwork, openai } from '@inngest/agent-kit'; // searchAgent and summaryAgent definitions... // Create a network with two agents. const network = createNetwork({ agents: [searchAgent, summaryAgent], }); // Run the network with a user prompt await network.run('What happened in the 2024 Super Bowl?'); ``` By calling `run()`, the network runs a core loop to call one or more agents to find a suitable answer. ## How Networks work Networks can be thought of as while loops with memory ([State](/concepts/state)) that call Agents and Tools until the Router determines that there is no more work to be done. You create a network with a list of available [Agents](/concepts/agents). Each Agent can use a different [model and inference provider](/concepts/models). You give the network a user prompt by calling `run()`. The network runs its core loop: The [Router](/concepts/routers) decides the first Agent to run with your input. Call the Agent with your input. This also runs the agent's [lifecycles](/concepts/agents#lifecycle-hooks), and any [Tools](/concepts/tools) that the model decides to call. Stores the result in the network's [State](/concepts/state). State can be accessed by the Router or other Agent's Tools in future loops. Return to the top of the loop and calls the Router with the new State. The Router can decide to quit or run another Agent. ## Model configuration A Network must provide a default model which is used for routing between Agents and for Agents that don't have one: ```tsx import { createNetwork, openai } from '@inngest/agent-kit'; // searchAgent and summaryAgent definitions... const network = createNetwork({ agents: [searchAgent, summaryAgent], defaultModel: openai({ model: 'gpt-4o' }), }); ``` A Network not defining a `defaultModel` and composed of Agents without model will throw an error. ### Combination of multiple models Each Agent can specify it's own model to use so a Network may end up using multiple models. Here is an example of a Network that defaults to use an OpenAI model, but the `summaryAgent` is configured to use an Anthropic model: ```tsx import { createNetwork, openai, anthropic } from '@inngest/agent-kit'; const searchAgent = createAgent({ name: 'Search', description: 'Search the web for information', }); const summaryAgent = createAgent({ name: 'Summary', description: 'Summarize the information', model: anthropic({ model: 'claude-3-5-sonnet' }), }); // The searchAgent will use gpt-4o, while the summaryAgent will use claude-3-5-sonnet. const network = createNetwork({ agents: [searchAgent, summaryAgent], defaultModel: openai({ model: 'gpt-4o' }), }); ``` ## Routing & maximum iterations ### Routing A Network can specify an optional `defaultRouter` function that will be used to determine the next Agent to run. ```ts import { createNetwork } from '@inngest/agent-kit'; // classifier and writer Agents definition... const network = createNetwork({ agents: [classifier, writer], router: ({ lastResult, callCount }) => { // retrieve the last message from the output const lastMessage = lastResult?.output[lastResult?.output.length - 1]; const content = lastMessage?.type === 'text' ? lastMessage?.content as string : ''; // First call: use the classifier if (callCount === 0) { return classifier; } // Second call: if it's a question, use the writer if (callCount === 1 && content.includes('question')) { return writer; } // Otherwise, we're done! return undefined; }, }); ``` Refer to the [Router](/concepts/routers) documentation for more information about how to create a custom Router. ### Maximum iterations A Network can specify an optional `maxIter` setting to limit the number of iterations. ```tsx import { createNetwork } from '@inngest/agent-kit'; // searchAgent and summaryAgent definitions... const network = createNetwork({ agents: [searchAgent, summaryAgent], defaultModel: openai({ model: 'gpt-4o' }), maxIter: 10, }); ``` Specifying a `maxIter` option is useful when using a [Default Routing Agent](/concepts/routers#default-routing-agent-autonomous-routing) or a [Hybrid Router](/concepts/routers#hybrid-code-and-agent-routers-semi-supervised-routing) to avoid infinite loops. A Routing Agent or Hybrid Router rely on LLM calls to make decisions, which means that they can sometimes fail to identify a final condition. ### Combining `maxIter` and `defaultRouter` You can combine `maxIter` and `defaultRouter` to create a Network that will stop after a certain number of iterations or when a condition is met. However, please note that the `maxIter` option can prevent the `defaultRouter` from being called (For example, if `maxIter` is set to 1, the `defaultRouter` will only be called once). ## Providing a default State A Network can specify an optional `defaultState` setting to provide a default [State](/concepts/state). ```tsx import { createNetwork } from '@inngest/agent-kit'; // searchAgent and summaryAgent definitions... const network = createNetwork({ agents: [searchAgent, summaryAgent], defaultState: new State({ foo: 'bar', }), }); ``` Providing a `defaultState` can be useful to persist the state in database between runs or initialize your network with external data. # Routers Source: https://agentkit.inngest.com/concepts/routers Customize how calls are routed between Agents in a Network. The purpose of a Network's **Router** is to decide what [Agent](/concepts/agents) to call based off the current Network [State](/concepts/state). ## What is a Router? A router is a function that gets called after each agent runs, which decides whether to: 1. Call another agent (by returning an `Agent`) 2. Stop the network's execution loop (by returning `undefined`) The routing function gets access to everything it needs to make this decision: * The [Network](/concepts/networks) object itself, including it's [State](/concepts/state). {/* TODO - The "stack" of agents isn't clear how this stack is created and when they are executed in relation to the router */} * The stack of [Agents](/concepts/agents) to be called. * The number of times the Network has called Agents (*the number of iterations*). * The result from the previously called Agent in the Network's execution loop. For more information about the role of a Router in a Network, read about [how Networks work](/concepts/networks#how-networks-work). ## Using a Router Providing a custom Router to your Network is optional. If you don't provide one, the Network will use the "Default Router" Routing Agent. Providing a custom Router to your Network can be achieved using 3 different patterns: * **Writing a custom [Code-based Router](/concepts/routers#code-based-routers-supervised-routing)**: Define a function that makes decisions based on the current [State](/concepts/state). * **Creating a [Routing Agent](/concepts/routers#routing-agent-autonomous-routing)**: Leverages LLM calls to decide which Agents should be called next based on the current [State](/concepts/state). * **Writing a custom [Hybrid Router](/concepts/routers#hybrid-code-and-agent-routers-semi-supervised-routing)**: Mix code and agent-based routing to get the best of both worlds. ## Creating a custom Router Custom Routers can be provided by defining a `defaultRouter` function returning either an instance of an `Agent` object or `undefined`. ```ts import { createNetwork } from "@inngest/agent-kit"; // classifier and writer Agents definition... const network = createNetwork({ agents: [classifier, writer], router: ({ lastResult, callCount }) => { // retrieve the last message from the output const lastMessage = lastResult?.output[lastResult?.output.length - 1]; const content = lastMessage?.type === "text" ? (lastMessage?.content as string) : ""; // First call: use the classifier if (callCount === 0) { return classifier; } // Second call: if it's a question, use the writer if (callCount === 1 && content.includes("question")) { return writer; } // Otherwise, we're done! return undefined; }, }); ``` The `defaultRouter` function receives a number of arguments: ```ts @inngest/agent-kit interface RouterArgs { network: Network; // The entire network, including the state and history stack: Agent[]; // Future agents to be called callCount: number; // Number of times the Network has called agents lastResult?: InferenceResult; // The the previously called Agent's result } ``` The available arguments can be used to build the routing patterns described below. ## Routing Patterns ### Tips * Start simple with code-based routing for predictable behavior, then add agent-based routing for flexibility. * Remember that routers can access the network's [state](/concepts/state) * You can return agents that weren't in the original network * The router runs after each agent call * Returning `undefined` stops the network's execution loop That's it! Routing is what makes networks powerful - it lets you build workflows that can be as simple or complex as you need. ### Code-based Routers (supervised routing) The simplest way to route is to write code that makes decisions. Here's an example that routes between a classifier and a writer: ```ts import { createNetwork } from "@inngest/agent-kit"; // classifier and writer Agents definition... const network = createNetwork({ agents: [classifier, writer], router: ({ lastResult, callCount }) => { // retrieve the last message from the output const lastMessage = lastResult?.output[lastResult?.output.length - 1]; const content = lastMessage?.type === "text" ? (lastMessage?.content as string) : ""; // First call: use the classifier if (callCount === 0) { return classifier; } // Second call: if it's a question, use the writer if (callCount === 1 && content.includes("question")) { return writer; } // Otherwise, we're done! return undefined; }, }); ``` Code-based routing is great when you want deterministic, predictable behavior. It's also the fastest option since there's no LLM calls involved. ### Routing Agent (autonomous routing) Without a `defaultRouter` defined, the network will use the "Default Routing Agent" to decide which agent to call next. The "Default Routing Agent" is a Routing Agent provided by Agent Kit to handle the default routing logic. You can create your own Routing Agent by using the [`createRoutingAgent`](/reference/network-router#createroutingagent) helper function: ```ts import { createRoutingAgent } from "@inngest/agent-kit"; const routingAgent = createRoutingAgent({ name: "Custom routing agent", description: "Selects agents based on the current state and request", lifecycle: { onRoute: ({ result, network }) => { // custom logic... }, }, }); // classifier and writer Agents definition... const network = createNetwork({ agents: [classifier, writer], router: routingAgent, }); ``` Routing Agents look similar to Agents but are designed to make routing decisions: - Routing Agents cannot have Tools. - Routing Agents provides a single `onRoute` lifecycle method. ### Hybrid code and agent Routers (semi-supervised routing) And, of course, you can mix code and agent-based routing. Here's an example that uses code for the first step, then lets an agent take over: ```tsx import { createNetwork, getDefaultRoutingAgent } from "@inngest/agent-kit"; // classifier and writer Agents definition... const network = createNetwork({ agents: [classifier, writer], router: ({ callCount }) => { // Always start with the classifier if (callCount === 0) { return classifier; } // Then let the routing agent take over return getDefaultRoutingAgent(); }, }); ``` This gives you the best of both worlds: * Predictable first steps when you know what needs to happen * Flexibility when the path forward isn't clear ### Using state in Routing The router is the brain of your network - it decides which agent to call next. You can use state to make smart routing decisions: ```tsx import { createNetwork } from '@inngest/agent-kit'; // mathAgent and contextAgent Agents definition... const network = createNetwork({ agents: [mathAgent, contextAgent], router: ({ network, lastResult }): Agent | undefined => { // Check if we've solved the problem const solution = network.state.data.solution; if (solution) { // We're done - return undefined to stop the network return undefined; } // retrieve the last message from the output const lastMessage = lastResult?.output[lastResult?.output.length - 1]; const content = lastMessage?.type === 'text' ? lastMessage?.content as string : ''; // Check the last result to decide what to do next if (content.includes('need more context')) { return contextAgent; } return mathAgent; }; }); ``` ## Related Concepts Networks combines the State and Router to execute Agent workflows. State is a key-value store that can be used to store data between Agents. # State Source: https://agentkit.inngest.com/concepts/state Shared memory, history, and key-value state for Agents and Networks. State is shared memory, or context, that is be passed between different [Agents](/concepts/agents) in a [Networks](/concepts/networks). State is used to store message history and build up structured data from tools. State enables agent workflows to execute in a loop and contextually make decisions. Agents continuously build upon and leverage this context to complete complex tasks. AgentKit's State stores data in two ways: * **History of messages** - A list of prompts, responses, and tool calls. * **Fully typed state data** - Typed state that allows you to build up structured data from agent calls, then implement [deterministic state-based routing](/advanced-patterns/routing) to easily model complex agent workflows. Both history and state data are used automatically by the Network to store and provide context to the next Agent. ## History The history system maintains a chronological record of all Agent interactions in your Network. Each interaction is stored as an `InferenceResult`. Refer to the [InferenceResult reference](/reference/state#inferenceresult) for more information. ## Typed state State contains typed data that can be used to store information between Agent calls, update agent prompts, and manage routing. Networks, agents, and tools use this type in order to set data: ```ts export interface NetworkState { // username is undefined until extracted and set by a tool username?: string; } // You can construct typed state with optional defaults, eg. from memory. const state = createState({ username: "default-username", }); console.log(state.data.username); // 'default-username' state.data.username = "Alice"; console.log(state.data.username); // 'Alice' ``` Common uses for data include: * Storing intermediate results that other Agents might need within lifecycles * Storing user preferences or context * Passing data between Tools and Agents * State based routing The `State`'s data is only retained for a single `Network`'s run. This means that it is only short-term memory and is not persisted across different Network `run()` calls. You can implement memory by inspecting a network's state after it has finished running. State, which is required by [Networks](/concepts/networks), has many uses across various AgentKit components. Refer to the [State reference](/reference/state#reading-and-modifying-state-states-data) for more information. ## Using state in tools State can be leveraged in a Tool's `handler` method to get or set data. Here is an example of a Tool that uses `kv` as a temporary store for files and their contents that are being written by the Agent. ```ts const writeFiles = createTool({ name: "write_files", description: "Write code with the given filenames", parameters: z.object({ files: z.array( z.object({ filename: z.string(), content: z.string(), }) ), }), handler: (output, { network }) => { // files is the output from the model's response in the format above. // Here, we store OpenAI's generated files in the response. const files = network.state.data.files || {}; for (const file of output.files) { files[file.filename] = file.content; } network.state.data.files = files; }, }); ``` {// TODO // - Using state in routers (why, how, example) // - Using state in agent prompts (why, how, example) } # Tools Source: https://agentkit.inngest.com/concepts/tools Extending the functionality of Agents for structured output or performing tasks. Tools are functions that extend the capabilities of an [Agent](/concepts/agents). Tools have two core uses: * Calling code, enabling models to interact with systems like your own database or external APIs. * Turning unstructured inputs into structured responses. A list of all available Tools and their configuration is sent in [an Agent's inference calls](/concepts/agents#how-agents-work) and a model may decide that a certain tool or tools should be called to complete the task. Tools are included in an Agent's calls to language models through features like OpenAI's "[function calling](https://platform.openai.com/docs/guides/function-calling)" or Claude's "[tool use](https://docs.anthropic.com/en/docs/build-with-claude/tool-use)." ## Creating a Tool Each Tool's `name`, `description`, and `parameters` are part of the function definition that is used by model to learn about the tool's capabilities and decide when it should be called. The `handler` is the function that is executed by the Agent if the model decides that a particular Tool should be called. Here is a simple tool that lists charges for a given user's account between a date range: ```ts import { createTool } from '@inngest/agent-kit'; const listChargesTool = createTool({ name: 'list_charges', description: "Returns all of a user's charges. Call this whenever you need to find one or more charges between a date range.", parameters: z.object({ userId: z.string(), created: z.object({ gte: z.string().date(), lte: z.string().date(), }), }), handler: async ({ userId, created }, { network, agent, step }) => { // output is strongly typed to match the parameter type. return [{...}] }, }); ``` Writing quality `name` and `description` parameters help the model determine when the particular Tool should be called. ### Optional parameters Optional parameters should be defined using `.nullable()` (not `.optional()`): ```ts {7-10} const listChargesTool = createTool({ name: 'list_charges', description: "Returns all of a user's charges. Call this whenever you need to find one or more charges between a date range.", parameters: z.object({ userId: z.string(), created: z.object({ gte: z.string().date(), lte: z.string().date(), }).nullable(), }), handler: async ({ userId, created }, { network, agent, step }) => { // output is strongly typed to match the parameter type. return [{...}] }, }); ``` ## Examples You can find multiple examples of tools in the below GitHub projects: A tutorial showing how to create a Hacker News Agent using AgentKit Code-style routing and Agents with tools. This AgentKit example uses the SWE-bench dataset to train an agent to solve coding problems. It uses advanced tools to interact with files and codebases. {/* TODO - Talk about the handler arguments and what you can do */} {/* TODO - Typing with zod */} {/* TODO - Showing how tools can be used for structured output */} {/* TODO - Leveraging state within tools */} {/* TODO - Using tool output from agent.run */} {/* TODO - Using Inngest steps with tools, human in the middle, etc. */} # Examples Source: https://agentkit.inngest.com/examples/overview Explore the following examples to see AgentKit Concepts (*Agents, Tools, ...*) in action: ## Tutorials This example shows how to leverages AgentKit's Agent to build an assistant that explain code. Agents A tutorial showing how to create a Hacker News Agent using AgentKit Code-style routing and Agents with tools. Agents Tools Network State
Code-based Router

## MCP as tools examples This examples shows how to use the [Neon MCP Smithery Server](https://smithery.ai/server/neon/) to build a Neon Assistant Agent that can help you manage your Neon databases.
Agents Tools Network Integrations
Code-based Router

## Code Examples This AgentKit example shows how to build a Support Agent Network with a "Human in the loop" pattern. Agents Tools Network
Agent Router
This AgentKit example uses the SWE-bench dataset to train an agent to solve coding problems. It uses advanced tools to interact with files and codebases. Agents Tools Network
Code-based Router
This AgentKit example uses E2B sandboxes to build a coding agent that can write code in any language. Agents Tools Network Integrations
Code-based Router
# Installation Source: https://agentkit.inngest.com/getting-started/installation How to install AgentKit Install the AgentKit [npm package](https://www.npmjs.com/package/@inngest/agent-kit) using your favorite package manager: ```shell npm npm install @inngest/agent-kit ``` ```shell pnpm pnpm install @inngest/agent-kit ``` ```shell yarn yarn add @inngest/agent-kit ``` For a better local developement and production deployment experience, we recommend installing [Inngest](https://www.npmjs.com/package/inngest) alongside AgentKit: ```shell npm npm install inngest ``` ```shell pnpm pnpm install inngest ``` ```shell yarn yarn add inngest ``` ## Beyond installation Discover Inngest's Dev Server with live traces and logs. Add concurrency and throttling to your AgentKit network and deploy it to Inngest. # Local development Source: https://agentkit.inngest.com/getting-started/local-development Run AgentKit locally with live traces and logs. Developing AgentKit applications locally is a breeze when combined with the [Inngest Dev Server](https://www.inngest.com/docs/dev-server). The Inngest Dev Server is a local development tool that provides live traces and logs for your AgentKit applications, providing a quicker feedback loop and full visibility into your AgentKit's state and Agent LLM calls: